Chocolate Cage Tutorial

Once upon a time, 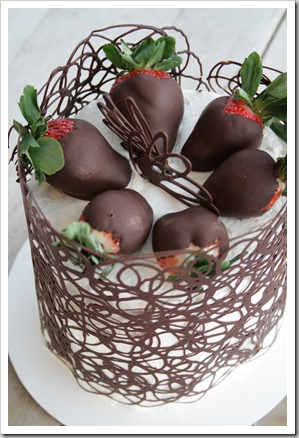 I made this cake, complete with a Chocolate Cage.
And then I posted it on Facebook.
About a gazillion of you said you, too, wanted to know how to decorate a cake in such a fashion. So, here I am, willing to offer you a chocolate cage tutorial.
There’s really not all that much to it, to be honest. It just LOOKS fussy and complicated. Truth be told, if you can throw some icing on a cake, the chocolate cage will only add a few short minutes of extra time. And, if you can’t ice a cake so well, no problem…no one’s really going to see those mistakes anyway, as they are hidden by the cage.
Now, I did NOT take step by step photos when I made the original cake, which was a deep, dark chocolate cake with a hint of hazelnut, chocolate ganache, strawberry whipped cream, and chocolate covered strawberries as a garnish.
It was pretty incredible, if I do say so myself. If you all want the recipe, tell me here in the comments, and I will take one for the team and REMAKE that cake. And I’ll eat it. But then I will blog about it and give you the recipe.
Team player, y’all.
The Chocolate Cage Tutorial
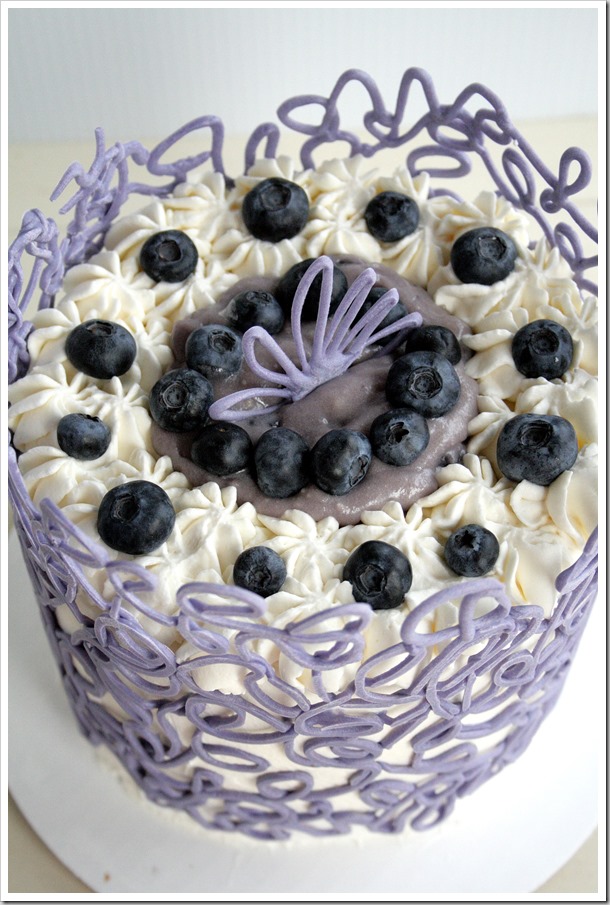
To change things up, for this chocolate cage tutorial, I made a lemon cake filled with blueberry whipped cream and iced it with sweetened whipped cream. For the chocolate age, I tinted white chocolate.
Let me stop right now and tell you something.
If you are a virgin in the world of chocolate, I’m going to recommend that you do not start your cage making experience by using white chocolate. And, if you do, don’t try to tint it. Why? White chocolate is more difficult to work with. It’s temperamental to melt (if it gets too hot, throw it out, you’re done), and if you use a tint with too much liquid in it, that white chocolate will seize up in a heartbeat. Add to that it dries faster, which means you have little time to work with it.
Now, I did all right on mine, though it DID dry on me before I could wrap the cake. My solution? A quick trip to the oven for a few seconds got it back to where I needed it. But again, just know that working with dark or milk chocolate will be much, much easier.
I kid you not. I love you guys, so I’m not trying to trick you.
Now, let’s move on to the cage making extravaganza.
Step By Step
First things first – make your cake. In case you aren’t a big baker, use a box mix. Just take my advise and add a bit less water and one extra egg. That will make the cake richer and sturdier. You want this.
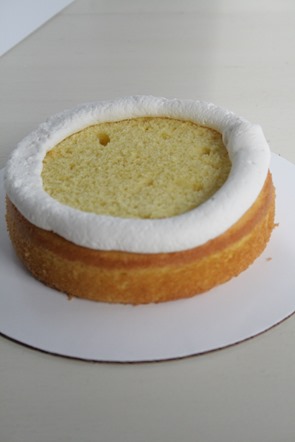
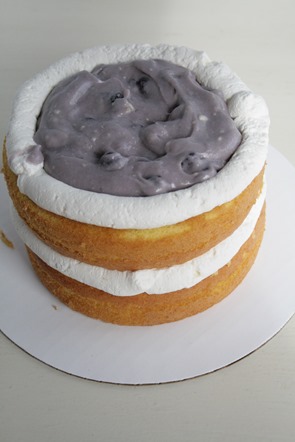
I made my cake in 3 six inch cake pans, so that it’s taller. And that’s one box mix, in case you are curious. Once I leveled each layer, the stacking began. As you can see, I piped a border of the plain whipped cream to keep the blueberry whipped cream contained in the center. From there, I added the second layer with the same technique, and finally, the top.
I use wooden skewers or a strong drinking straw to keep my cakes standing straight and tall, and to keep them from wiggling as I decorate them. Just measure the height you need and insert the skewer in the center of the cake from the top. Pretty easy stuff. Once that’s done, I iced the cake in the plain whipped cream, and into the refrigerator it went to cool.
How To: The Chocolate Cage
Now comes the cage.
Roll out a piece of parchment paper large enough to fully wrap around the cake. Now, I like my cage to be taller than the cake, so if you want the same thing, be sure the width of your parchment extends as high as you want it to. For my 8 inch tall cake, I made my cage 10-11 inches tall.
Once your chocolate is JUST melted (not too runny, not to hot, just melted), load it into a piping bag. Snip the end just a bit, leaving a fairly small hole for the chocolate to pipe through. If it seems too small, snip a little more. You don’t want the cage to be too fragile, so don’t make the piped lines too tiny. There’s your warning.
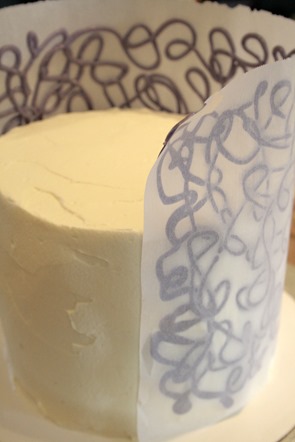
Now, pipe all manner of swirls onto your parchment. It will look something like this:
Again, more is better, you don’t want it too fragile.
The next step is the most difficult. You need to watch the chocolate.
Just – watch it.
It will start to set, losing it’s shine. Once it’s almost dry, but when you pick up the parchment it still bends freely, it’s time to apply it to the cake.
Applying the Cage to the Cake
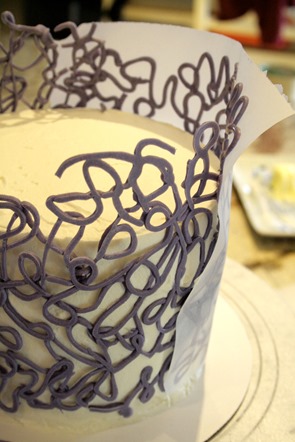
Take that parchment, chocolate facing the cake, and wrap it around the cake. Do. Not. Scoot. It. In. To. Place. Put it where you want it the first time. If you wiggle it, it will smear. No good. Just tackle it with volition, and gently press it into the sides of the cake. The extra part at the top will hold up fine, really. It will be okay.
Back into the fridge with it.
In about 5 minutes, it will be all set. You can leave it longer, but I have this sneaky feeling you won’t be able to wait it out.
Carefully, very carefully…start peeling the the parchment away.
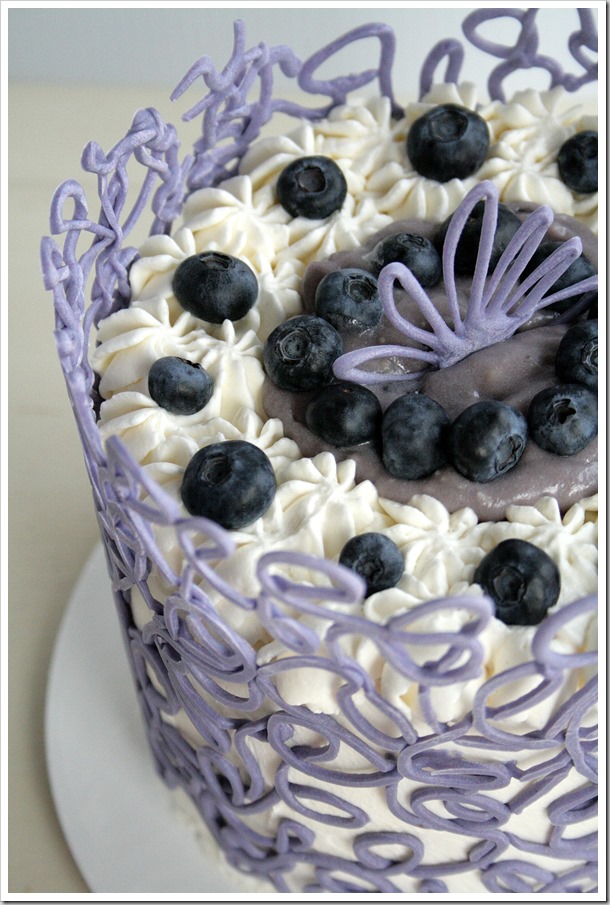
Voila! You have made a chocolate cage! Now decorate it however you like. For this blueberry cake, I piped some more whipped cream, added a bit more blueberry cream to the center, and added a few fresh berries. I also added another piped chocolate flourish. Nothing too fancy.
So did that help? Are you ready to do it yourself?
Feel free to ask me any questions you like, I’m here!
Helpful Tools for Making a Chocolate Cage




February 26, 2014 @ 3:30 am
Hi,
Am I correct in assuming you don’t use tempered chocolate, just melted chocolate?
Am using it today and freaking out a bit :S
Thank you!
February 26, 2014 @ 2:14 pm
Yep, just melted chocolate! Good luck, and let me know how you do!
May 6, 2014 @ 1:06 am
You are so creative. Thanks for the inspiration. I am going to try this with words in different colored chocolate. Fingers crossed.
June 10, 2014 @ 10:21 am
I am wondering if you would share your recipe for the blueberry filling used in this cake. Thanks!
July 23, 2014 @ 10:16 am
Hey I was just wondering what kind of chocolate you used? This is probably something I’m overthinking but I have chocolate chip. Do I just melt those or do I need to add a little bit of oil?
July 27, 2014 @ 8:43 pm
Just chocolate chips is fine! DOn’t add anything!
October 1, 2014 @ 8:52 am
Would the chocolate melt as it’s against the whipped cream? I want to finish the cake a day before the party but concerned that the chocolate cage will collapse. How can can I leave the chocolate against the cream?
October 5, 2014 @ 8:14 pm
I’ve never had my cage melt at all, even after several days. Just keep the cake in the fridge, and bring it out at least an hour before ou serve it to warm it up to room temp. Let me know what you think!
November 22, 2014 @ 3:16 pm
amazing!! What do you use to tint the chocolate??
January 11, 2015 @ 11:12 pm
Hi! What an awesome idea and a fairly easy way to make a cake look super fancy! I’ll be trying this for Valentine’s Day… did you ever post that recipe for the dark chocolate cake with ganache?? Would love that! And maybe more importantly, when serving the cake, do you cut through the cage or need to remove it first? Thanks!
January 13, 2015 @ 12:22 am
Looks amazing! Want to try this for a bridal shower I’m throwing. The Bride’s mom is a cake caterer, so I was hoping to impress. LOL Am I understanding you correctly that you are using melted Chocolate chips? or are you using like Candy Quik/Almond Bark, etc? Just want to clarify before I go shopping.
January 24, 2015 @ 4:54 pm
Thanks for sharing. I tried this today and it turned out better than I expected for my first attempt! Wouldn’t have tried it without your tutorial as it looks more complicated than it really is!
January 25, 2015 @ 10:44 pm
This is genius, thanks for sharing. I was just wondering if you’ve ever done it with the Wilton melts. I just thought it might be easier than tinting for the different colors. Thanks!
January 28, 2015 @ 6:14 am
This is an awesome idea….can’t wait to try it! If using chocolate chips….how much did you melt?
I’d also like to know how hard it is to cut? It looks like the cage would break into pieces when cut.
February 9, 2015 @ 9:25 am
OMG Amazing !!
February 9, 2015 @ 5:03 pm
Awesome cake!!! I;m a novice baker but would love to try this. Could I please have both cake recipes?
February 15, 2015 @ 11:53 am
That looks fantastic. How do you cut through the cage when you are serving? Doesn’t it start to break and crack in all the wrong spots?
February 16, 2015 @ 11:01 pm
That cake is gorgeous! You’re a genius! Can I get the recipe for that cake and blueberry whipped cream? Please??? 🙂
February 18, 2015 @ 11:43 pm
So pretty. I’ve never worked with chocolate (I paid attention to the tinted white choc warning!), but I can’t wait to try this and surprise family (or, myself! ha ha).
February 15, 2021 @ 4:37 pm
How do you transport a cake with a cake 3 hours travel time… it fits no cake taker.., you can’t keep it chilled.. I don’t know what to do😞
April 6, 2015 @ 8:22 am
This is amazing! I am making a birthday cake for my sister today and was searching for great decorating ideas…found it. Wish me luck! Did I miss the post of the actual recipe for the dark chocolate cake with a hint of hazelnut, chocolate ganache, strawberry whipped cream, and chocolate covered strawberries as a garnish?
April 6, 2015 @ 2:24 pm
Hi There so I just tried it! In the fridge and the suspense is killing me. I buggered up a bit since the weight of the chocolate when I was wrapping the cake, bend over and smudged the whipped cream icing. Its ok though…I will see how it looks when it comes out of the fridge….I can either whip up a bit of cream to hide it…Or decorate with chocolate strawberries….my thoughts so far. I have a feeling I should have waited for the chocolate to set more?
April 6, 2015 @ 4:22 pm
it worked it worked! I dont know how to post a picture but I am so excited!!!
April 8, 2015 @ 11:37 am
Of COURSE it worked! Lol! I’m so glad you had success. Wasn’t it easy??
April 11, 2015 @ 10:12 am
Georgous!!! I love the effect, looks classy and chic!!! I wonder do if I can do it around a fondant cake? You think it would sticks to it? Thanks again for your tuto!
April 27, 2015 @ 9:03 pm
I’m not sure about fondant…maybe? I do other things to fondant…so how about YOU let ME know? 🙂
April 28, 2015 @ 11:52 am
Hi, I loved the tutorial and I plan to re-create it for a 3-tier cake – just wondered how much chocolate for the cage? Thanks!
May 26, 2015 @ 10:56 pm
Geesh! It depends on the sizes of your layers. As you get going, just make more as you see the need. I think that’s the best course of action, and that’s what I would do!
May 1, 2015 @ 10:20 am
Wow, this technique worked perfectly on my first go! Thank you too much for posting this!!!
May 26, 2015 @ 10:54 pm
Wonderful! Thanks for letting me know!
May 26, 2015 @ 12:27 pm
Does the cage get soft once placed on the cake and left at room temperature?
May 26, 2015 @ 10:52 pm
Not really – it stays solid like chocolate chips do. if it’s hot though, expect it to get a little melty.
June 5, 2015 @ 1:53 am
You are extravagant. Thank you for sharing your expertise. You’re also funny with your words which made it worth my while to read. Love to learn new techniques as I am also into cake decorating.
June 14, 2015 @ 5:18 pm
I want to try this cage for my mom’s birthday. I was reading the comments and I never saw a response how easily it is to cut through. Does the cage collapse when you cut it ?
June 22, 2015 @ 10:52 am
Not exactly collapse…it is brittle, as it IS chocolate. If you use a HOT knife, it will slice. Typically, we don’t worry about it, and just break it into pieces as we cut it. tastes the same!
February 6, 2019 @ 5:06 am
Thank you so much for sharing .L was wondering if l can do it perfectly.
September 23, 2020 @ 8:20 am
What a fantastic tutorial and excellent tips!! Im excited to give it a try. I would absolutely love and appreciate both of these cake recipes.
March 30, 2021 @ 1:08 am
Could you please share your recipes?
January 20, 2022 @ 11:49 am
The recipe for your cake—where do I find?🤗
January 28, 2022 @ 1:05 pm
You can use any recipe, or a box mix!
January 20, 2022 @ 11:50 am
Love the name of your website!!!😁
July 28, 2022 @ 4:09 pm
Can I use waxed paper instead of parchment?
July 28, 2022 @ 8:03 pm
I’ve not tried – but maybe?
June 16, 2023 @ 8:19 am
can I make a chocolate cage ahead of time and store it in the freezer?
June 25, 2023 @ 9:47 pm
I’ve never done this, but maybe? It should, however, last several days in the refrigerator, so maybe attempt that first?