A couple of weeks ago, I was Tweeting with
Kayte of Grandma’s Kitchen Table. If you don’t know about Kayte, or haven’t visited her blog, you should. While she doesn’t give herself enough credit for the time she spends in the kitchen, she
really does a great job. Add to that she is a wonderful mother, and her love shows though every post. You can’t just make that stuff up to sound good, she is
realllllly into her kids. I hope I turn out like that someday.
Until then, I will use her hand-me-down Milk Bread recipe to win over my family. So far, it’s working. You may remember this about me, or you may be new here at DoughMessTic, but you should know that anything involving yeast does not fare well here. We keep it too cool in the house. And I basically suck at bread making in general, which is a double whammy. So…me plus yeast plus trying to make bread is usually a big FAIL. “But it’s a “no fail” recipe” Kayte says. “Of course you can do it!” – Yeah, right, Kayte. Thanks for the vote of confidence, but I know me.
Forsome odd reason I took her advice anyway and set out last week to make a loaf of this wonder bread. I can’t even tell you how many things I did wrong. Let’s start with laziness. Yes, laziness inspired me to make the entire thing in the KitchenAid. I never took it out. I let it rest there, I kneaded it there. I think I left out a whopping cup of flour. I forgot to let it raise the most important raise time of 30 minutes. But you know what? It worked. I’ll be damned if it didn’t. It baked off just fine and we ate the whole loaf. Don’t ask me how that happened, but God’s honest truth, it worked.
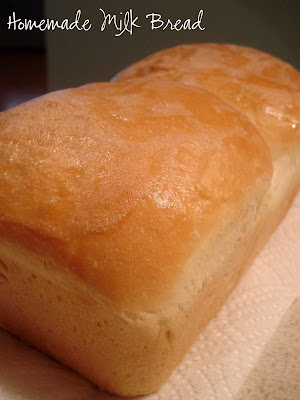
So today I decided i had better give it another go. You know, to up the ante a bit. So I doubled the recipe…in front of my Mother in Law. Seriously. If I was gonna fail, I was going to fail BIG TIME. I did actually knead it on the counter this go round – it was so perfect and gorgeous I didn’t want to take my hands off of it. But I did. I let it do it’s thing, I followed directions (mostly) and a couple of hours later I pulled two phenomenal loaves of bread out of my oven. Oh, they are pretty. And oh do they ever taste delicious! Granted, these loaves taste better and have a better consistancy than the original loaf I made, but the other was more than good. This, though, is in a league all it’s own.

Is this an artisan bread? No. It’s the perfect loaf of bread for making sandwiches. It has a yummy flavor, soft, lightly browned crusts. Kids will love it. And so will you…it’s too easy not to try it yourself! Trust me on this – double the recipe. Make a double batch. The amount of work is the same as one loaf, and one loaf just isn’t gonna be enough. You can come on back here and tell me all about it later! Ah, heck…I’m just gonna double it for you!
Homemade Milk Bread – Two Loaves
1 1/2 tsp Instant Yeast
3 cups Whole Milk
2 1/2 Tablespoons Corn Syrup
4 cups All Purpose Flour
4 cups Bread Flour
2 1/2 tsp. Sea Salt
4 Tablesppoins melted butter
In large bowl or Stand Mixer, beat yeast with milk and corn syrup. Change to dough hook (or large spoon) and add flours and salt until soft and well combined. Pour the melted butter over the dough and mix it in. Cover and let rise for 10 minutes.
Sprinkle your kneading surface with flour and knead the dough for about 10-20 seconds. Return to bowl, cover and wait another 10 minutes. Repeat the kneading process and wait again. And then again. Knead it a total now of 3 times. Turn the dough into a ball on the last kneading, cover and allow to rise for 30 minutes.
When dough has risen, grease and flour (or just be lazy like me and use Pam and forget the flour) 2 loaf pans. Divide the dough into 4 balls, and place two balls in each loaf pan. Cover with cloth and allow to rise until doubled.
Preheat oven to 410. Brush tops of dough with milk or cream. Bake for 15 minutes, then reduce the temperature to 350 and bake 22 more minutes. Try not to scald yourself getting a bite of the hot bread. 🙂
Hope you enjoy it!

I’d like to thank all of the Raiders who are working along with me this month – I hope you are learning as much as I am! Some of the Pantry Raiders are giving up already…but I applaud them for even giving it a go. I, however, am NOT giving up. In fact, I could live like this for months! Sure, I’d love to just order in a Pizza or go out to dinner, but this challenge has really opened my eyes to how much we waste, both moneywise and foodwise. I love the challenge of making something with the food I have. What is all of that food in the cabinets for anyway? Looks? Well, it isn’t just for looks anymore!
Day Nine Rundown: $3.29 Spent. We had to buy syrup, as I plan on making Popovers for our houseguests one morning. Jon’s folks are staying here for a few days…luckily, they brought some veggies from their garden, so we haven’t had to spend money yet. 🙂
Breakfast: Seven had an egg, grapes, bologna and cheese. I forgot to eat.
Lunch: Sev ate a hotdog, some cheese, some bread, a few berries, & a banana (from Jon’s Mom). I had a cucumber salad from the garden and used leftover Peanut Thai Vinaigrette. It was tasty! Jon had a turkey wrap, a Velveeta Macaroni to Go, a pudding, and applesauce.
Dinner: Even with company, we managed not to spend any money. We had Hamburgers – the buns I made and were frozen – the beef from our freezer, cheese from the fridge, spinach from the garden. I also made us a box of macaroni, and Jon’s Mom made green beans from her garden. Great meal – no money!
19 Days to Go, $79.48 left to spend.


