
Vanilla Making
Last year, when I started my own blog, I’ll admit I was completely clueless. I kept reading all these other bloggers claiming to have made Homemade Vanilla. Yeah right, I thought. That doesn’t seem likely. But I did the research, and found it could, in fact, be done…and very easily!
If you already make your own vanilla extract, good for you! You know what I mean when I say how easy it is – and how impressive it tastes, right?! Feel free to leave your comments here on any tricks or tips you might have for any newcomers in the Vanilla Making Department. I’m sure they will appreciate it!
Now, here’s the DoughMessTic tutorial on Vanilla Extract Making…I hope you’ll give it a shot! Last month I posted this tutorial over at Oven Love as a guest post, but I thought I would share it here, too, in case anyone missed it…I see it come up as a topic pretty often on Twitter!
First, you’ll need some good quality Vanilla Beans. You can find them online, but I get mine Here. For $25, you’ll get about 50 Grade A Madagascar Vanilla Beans, plus, they will send you close to 30 FREE Tahitian Extract Grade vanilla beans. So you’ll be set for quite some time in the Vanilla Bean department! Grocery stores don’t come close to competing with these prices – more likely than not, you’ll pay close to $5 for one bean. Eeeeek.
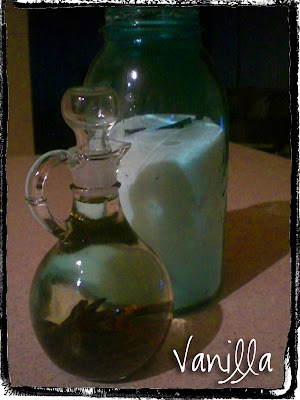
Next, secure yourself a big bottle of GOOD vodka. I typically use Skye, but there are lots of choices. The better the quality, the less the taste will interfere with your vanilla beans, so choose wisely.
Find a bottle to pour your vodka into, Walmart sells little bottle with stoppers, or you could simply use something as ordinary as an empty water bottle. I tend to make about 10 ounces at a time. For this size, I cut 6 beans in half then split them lengthwise and place them into the vodka. Do not scrape them. No need for that. Just put them in the bottle and give them a good shake every few days…for the next THREE months. I know, I know…torture. But you’ll be so rewarded in the end!

Now that you have so many extra vanilla beans, you may want to up the ante a bit and make your own Vanilla Sugar as well. Why not? You can use the seeds in some icing or whathaveyou, and just place the discarded beans in a container of sugar. Or, go ahead and split a bean and toss it in – you’ve got plenty now, right? Just be sure to give the jar a shake now and then to spread out the flavor…and feel free to use it at any time. Sure, the longer you let it sit, the better it tastes, but you can use this pretty much immediately. And just keep topping it off with more sugar and empty beans as you get them…the flavor lasts and lasts.
Hope you’ll give these a shot and amp up your baking…if nothing else, it gives you something to brag about!

Day 21 Rundown: Spent $5.13 (went to Walmart & grabbed a gallon of Milk and a pack of String Cheese.)
Breakfast: Seven was with Mom & Dad since I was working, so they took care of feeding him. I skipped.
Lunch: Jon is out of town working, and is on a per diem. This happens so rarely, but it does happen a few times a year, sometimes for weeks at a time. This trip is only for 3 days. But anyway, no money of ours was spent for him to eat. Being away from home doesn’t allow for us to pack him anything or let him eat home-cooked food. Sev was still at my folks, and Mom brought me a ham sandwich and a brownie to eat. Sweet.
Dinner: Jon ate out of his per diem allowance. Seven had a hot dog, leftover pancake, peaches, strong cheese and goldfish crackers. I ate a leftover pancake, too, and a piece of string cheese.
7 Days to Go, $42.99 left to spend. Only one week to go and a whopping $6.00 a day left to spend if need be!


