Double the Fun…Two Wedding Cakes, One Day–Live Blogging the Process
I’ve never done live blogging before… So bear with me.
Here’s where I am and what I am doing.
I have two wedding cakes due tomorrow, one to deliver to Radford and it’s River Course, about 40 minutes from here, and one after that, to deliver to Roanoke, which is about 1 hour and 15 minutes from here, at the historic Hotel Roanoke. Both require absolutely pristine fondant-work, and that does frighten me a bit. Most of the cakes I do typically have fresh flowers on them, and that allows for a few flaws. Of course, I try to be perfect on each of them, but it isn’t always possible. Huge cakes that require a fondant covering are pretty difficult to cover, logistically. Take a 15 inch cake for example. If it’s 4 inches tall, that means you have to roll a piece of fondant about 25 inches wide, just to be safe. No rips, no bubbles, all with a rolling pin. Then you have to roll that piece of fondant around your rolling pin, pray it doesn’t stick to itself, and then place it perfectly on the cake.
I secretly love that part.
Sure, it always gives me that butterfly-in-the-stomach feeling, but it’s kind of exciting to get it right. I love getting it right.
Anyhoooo.
Todays’s cakes are:
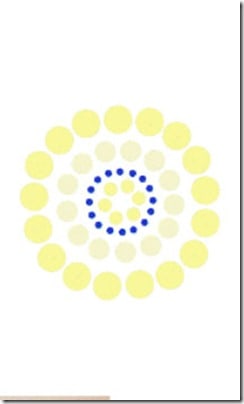
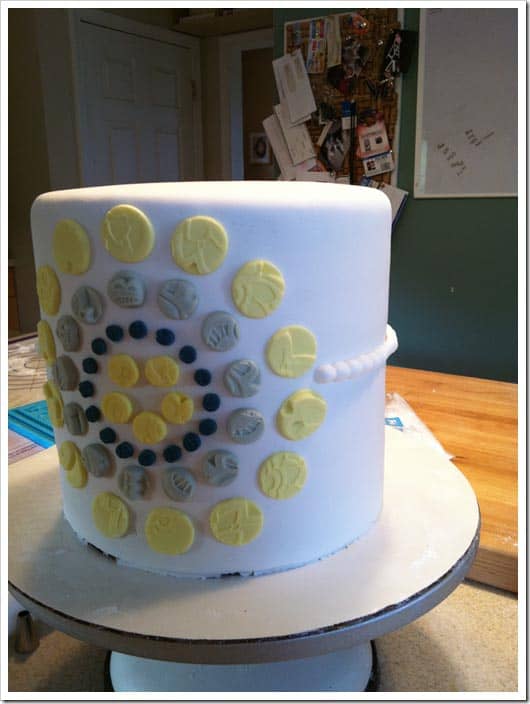
A smaller, 100 serving wedding cake. It has a regular base height, with a width of 11 inches, topped by 2 levels of 9 inch widths, creating a super tall layer, and then finished off with a 7 inch layer. It’s pretty much solid white, no flowers at all, and incorporates the couple’s wedding invitation design. The design is a large round shape, made up of smaller circles in varying shades of yellows and a blue-ish gray. My idea is to bring the design some dimension, versus having it lay flat. I have some impression molds that I just bought this week, and am pretty excited to try them out to see what looks best.
Cake Two is a big boy. It will feed 200, is hexagonal, and is solid white. Well, solid white but not plain in any way, shape or form. Each side of the hexagon has a pattern. Every other panel is quilted, with a tiny flower and pearl at each cross-hatch (yes, that means there are a LOT of them). The other panels are made up of different flower designs. Four levels, 24 panels, and roughly 200 tiny little flowers, just for the quilted panels. There’s plenty of other flowers to be made! I have to tope this cake with handmade fondant/gumpaste flowers, and so far, I’ve made 3 larger open roses, a few buds, and a dogwood flower. Still have some tiny flowers to make for it, some small branches, and calla lilies.
Here we go…just be sure to check back every hour or so to see the progress. I’ll also give you a heads up on Twitter & Facebook as I add new info. Stay tuned! (and wish me luck!)
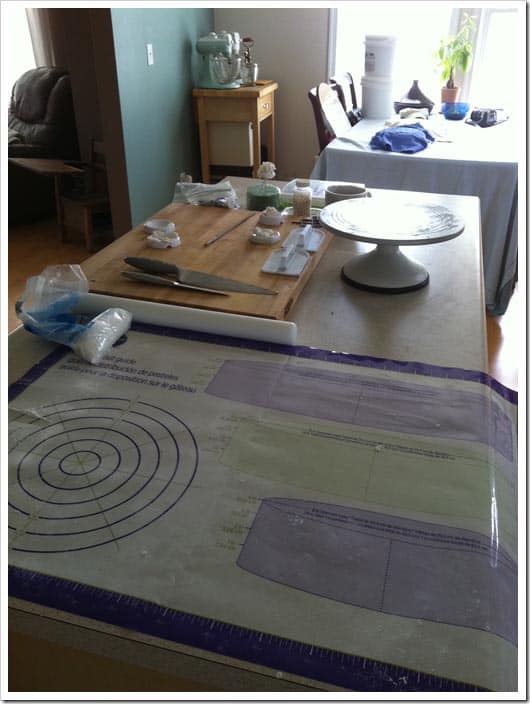
Here you see my mat that I roll fondant on, my great Fat Daddio’s cake turner, rolling pin, a few flowers I made late list night, and the various tools I’m starting the day with.
Below, you have one tier of the hexagon cake, crumb coated. I did that last night and refrigerated it to make it nice an firm and easier to work with today. Beside that, my fondant rolled out.


Update:
Fondant wrapped around rolling pin to transport to cake, and then placed on the cake…Then using paddles (I use two so that I don’t have to touch the cake too much), the fondant is smoothed and trimmed.


Update 2:
Using this plastic tool, I stamp the quilting pattern into 3 of the sides. Any area that the tool doesn’t reach, I use a knife to press the pattern.


Update 3:
I made a boatload of tiny flowers using the Wilton flower plunger. Cool tool. You just roll out your fondant, plunge, twist, and then push the plunger to eject the flower you made. I needed 63 for the quilting on this tier, plus about 20 more for other panels, so, I need a LOT of these little things. I used the flower cut-out, but also used the interchangeable cut-outs of a leaf and a larger star shaped flower. To make them a little more natural looking, I manipulate them with my fingers to thin them, spread them, etc. It’s a great little tool, and prefect for having to make hundreds of flowers! Here’s horrible one handed video to demonstrate, and a link to purchase one for yourself if you are so inclined…
Update 4:
I’ve attached all of the flowers on the quilting, plus made the other panels. Each flower is attached using a small paintbrush, then stuck on. The center of the flower is filled with a sugar pearl, again attached with a small paintbrush.
Each of the side panels features a different flower scene, and all flowers were made using my fingers, or the Wilton plunge tool, or both. I also used some small cookie/fondant cutters for a few of the flowers and leaves.
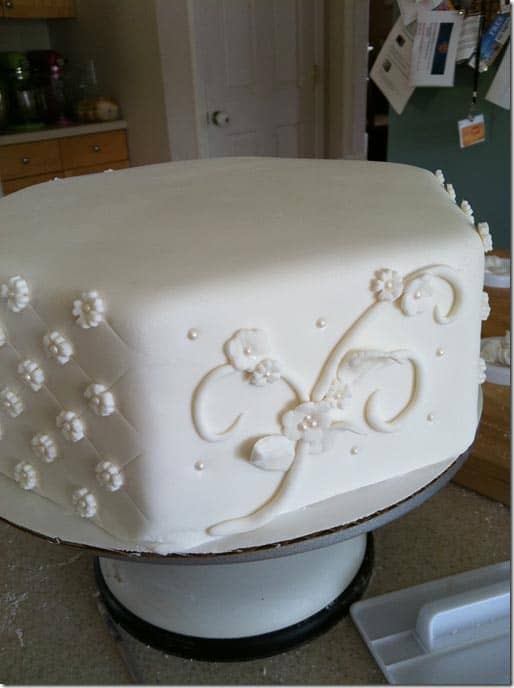
Update 5:
Well, the hexagon cake is all done, save for the stacking and delivering. I’ll be piping a dot border around the bottom of each tier, as well as on some of the cake. I’ll be sure to take a few pictures tomorrow as I deliver. That’s sometimes a challenge – you never know what can transpire during a delivery! Here’s a look at all 4 tiers hanging out in our store fridge (I baked a home, then store it in the fridge at our store.)
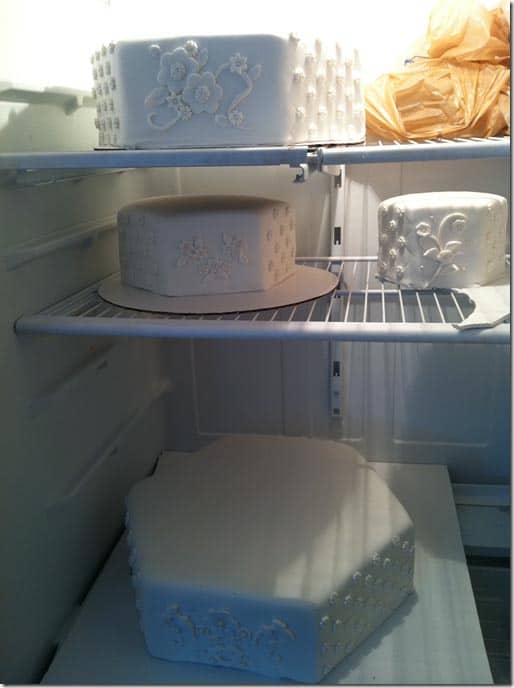
On to cake Number Two…
Here we are. Just leveled the cakes, and filled half with a fresh raspberry cream, and the other half with whipped chocolate ganache. These pictures are of the tall middle layer as I am putting it together. Again, 4 layers of cake. I placed dowels in the bottom half, and placed the top half on a cardboard round. It’s all crumb coated now and hanging out in the fridge to firm up. I’m working on the small top tier now, just wanted to update you!


Update 6:
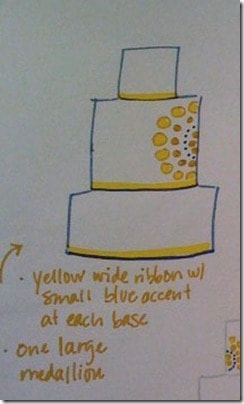
The middle layer of the contemporary cake is now covered in fondant. Whew. it’s 8 inches tall, and was a bit scary,m but this new batch of Satin Ice (the brand of fondant I am using) is perfect, and required very little kneading. Lucky! I am now getting ready to use y new impression mats to make some interesting patterns in the circles I will be using in the design…which is this:
I drew this rough sketch for the bride, and she loved it. It is based on her distaste for anything floral (absolutely NO flowers for this bride!) and her love of this circle pattern that is being carried from her invitations to the napkins, programs, and decorations.
Update 7: (Last before tomorrow, I want to go to the festival tonight!)
Got the middle tier done, pretty pleased! Decided to add a ball trim border around the center – it just needed …something. The balls play nicely since they are round, and fit in well with the design. Just got to cover the top and bottom tiers in fondant, but, hopefully that won’t take me more than an hour tonight…thanks for visiting today!! More tomorrow!






July 10, 2014 @ 9:55 pm
Fantastic post but I was wanting to know if you could write a litte more on this topic?
I’d be very thankful if you could elaborate a little bit
more. Bless you!
July 10, 2014 @ 9:55 pm
Fantastic post but I was wanting to know if you could write a litte more on this topic?
I’d be very thankful if you could elaborate a little bit
more. Bless you!