
The Cake Process Continues…
Hopefully you’re here, following along with the creation of this week’s wedding cake. I posted the inspiration, design, and ideas for you last night, and today I’ve been in the process of implementation.
This is the bottom layer. It’s 12 inches round, so, on the smaller side for a cake to feed over 200. However, this cake is a whopping 7 layers tall, nearly 2 feet. I am assembling it in halves, as each layer really relies on the one beneath it in the decoration process. I designed it so that the top and bottom half could be transported separately.
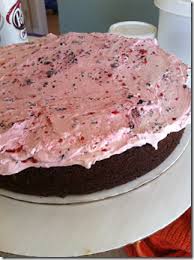
Anyway, this layer is Swiss Chocolate, filled with a fresh raspberry cheesecake buttercream. Yes, it’s GOOD. I had to sample, for quality control, of course. Here it is before I stacked and crumb coated it, as well as after quick spray of yellow and silver. I hadn’t yet pearlized it, nor had I added dragees to it for some sparkle. (You’ll see that in the video.)

Speaking of, here are a couple of little videos. In the first, you’ll see the bottom level of the cake, and how I am using stamps and royal icing and dragees to dress it up.
In the second video, I have a question for you.
What do you think? what would YOU do? Hurry – I’m standing by!
UPDATE:
Sorry for the lack of constant updating, it’s just that when you have fondant out, you have to move it or lose it, and I didn’t want to lose it! In fact, I was pretty much in the zone. Hopefully you have moments like that, when things are clicking, and going great. Today has been like that for me.


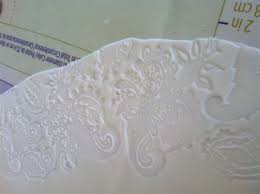
So let’s see…I decided, based on many of your suggestions, that I should give the long ruffles a little texture, So here’s what I did. On the bottommost layer of ruffles, I made the lacy pattern using the stamp. It was…challenging, but turned out nice! The middle layer I left plain, and the top layer I used this new-to-me technique…(You’ll need to watch the video)
And in case you want to see how I’ve attached all those layers of ruffles, you can watch this video:
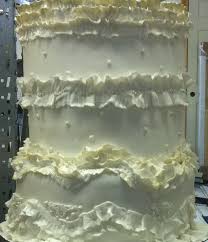
So, I grossly underestimated the height of this cake. Grossly. And I love math, so don’t ask me how I did that. The bottom half of this cake was 15 inches. The top half is 18, and the anniversary topper is about 4. Which means – 3 feet tall, and that doesn’t include the giant silver platform base the bride rented.
Woof. Should be good looking though!
Okay, the layer that goes on top of the ruffle layer is a 10 inch round, that I made a little unusual. Normally, you’ll trim your cake, and level it, placing the first cake cut side up, filled, and the second cake cut side down. Instead of doing that, I did the exact opposite, so that the cake had a bit of a middle bowing out. Just to be a little different. I was hoping it would show up a little more, but, it’s enough. I created a ton of yellow and white fondant balls, which I used on the base of that layer. The balls covered the top edges of those ruffles, making it appear seamless. I also added lots and lots of dragees in multiple sizes up the cake layer. Oh – I decided to give that layer a base coat of silver and pearl, just to break up the white. Lots and lots of white. And ruffles. Geesh – there are a lot of ruffles on this cake. Good thing it goes with her dress!
(Bear in mind, the very bottom of this cake is unfinished – it gets a clean border once it’s placed on the cakestand!)
More updates tomorrow – but here’s a little sneak peek of the middle layers…(I’ve been busy!)…
See you here tomorrow!


