Bon Appétit Cover Cake
So who here gets Bon Appétit every month? I know it’s not just me. And I feel pretty safe in saying that 90% of those of you who DO get it were entranced by the cover cake form last month’s issue.
The Chocolate Spice Torte on page 102.
The day I received the magazine in the mail, I flipped right to it. I had to. It was…mesmerizing.
But I didn’t have an occasion for it, and quite simply, it has major money wrapped up in it. Lots and lots of expensive chocolate (nearly FOUR pounds). My in-laws jokingly mentioned at Christmas that I should make it. Jokingly, I said. I don’t think they thought it could really be done. And, since it was a joke, I didn’t make it, and since that trip to visit them, I haven’t had the right occasion to warrant such a masterpiece. It’s not a cake you just decide to whip up one Saturday for no good reason.
That is, unless you are me.
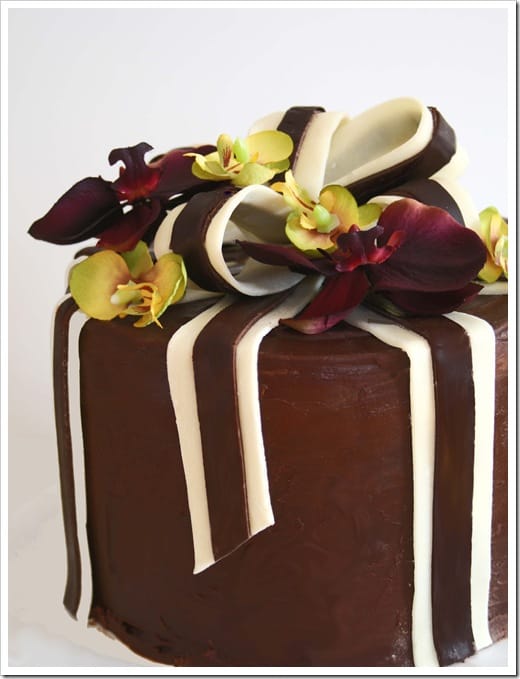
You see, it snowed a ton here on Friday night, and I happened to have every single ingredient on hand to make the cake. And I had umpteen hours to get it done.
So I did it.
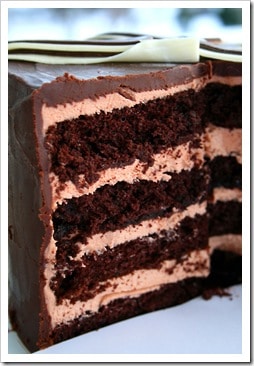
I omitted the nuts for the sheer fact that I don’t like eating a soft cake and then biting into a hard nut. It’s just a cake texture thing for me. I make LOTS of cake, I have my preferences. The cake layers were no issue – nice and easy and to the point. I did make mine into 4 layers instead of 3, and that made a bit taller of a cake, but I really liked the filling to cake ratio the 4 layers provided.
Other notes:
The Glaze…The pouring of the glaze over the cake was a big fat mess. I’m sure there’s some easy way, but hell if I know what it is. I got it all on, but not without having to clean up the chocolate overrun off the cake plate for 15 minutes. I’d relish any suggestions on how to make this happen neatly.
The Ribbons…The ribbons shouldn’t have been so complicated. In case you wonder what modeling chocolate tastes like, it’s very similar to a Tootsie Roll, just made with better chocolate. one thing I thought about before making the two colors was that you should obviously have more white than dark, but the recipe called for equal parts. I was right. You have just enough white chocolate for the ribbons, but about double what you need for the dark. Doing the math – it just makes sense. So feel free to reduce the amount of the dark chocolate ribbon recipe. No need to go wasting expensive dark chocolate if you don’t need to.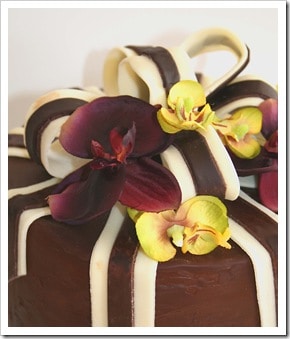
Also in regard to the ribbons, don’t expect the bows to just stay all round and perky like the cover picture. The chocolate is moldable, and therefore, it will kind of fall on itself once placed in the bow formation. What I did was place all of the flat ribbons onto the cake, and then form the bows into shape and lay them on their sides to set up. I allowed them to firm up overnight before placing them into position. They help up great after that! I also decided to add a few flowers to dress it up…I think it looks really pretty that way and a little less like a present or holiday-ish.
An aggravation…I don’t appreciate recipes, especially professional recipes, that call for Jumbo eggs. No one keeps Jumbo eggs in their refrigerator, at least not anyone I know. The buttercream called for 4 Jumbos – I used 5 Large. Large is the standard – and for a reason. Maybe Jumbo eggs were the egg of choice in the 1980’s when this recipe was first published…so if that’s the case, I will overlook it. If not, I hope someone from Bon Appétit is reading.
Thoughts:
The cake, despite numerous reviews of it being dry, was very moist. I did bake it 35 minutes per pan, however, I used 2 – 8 inch rounds (which I split once baked into 2 layers each) instead of 3 – 9 inch pans as directed. IN my opinion, 25 minutes would have been much more appropriate for the bake time, not 40 minutes.. 40 minutes would have resulted in a very overdone cake here.
The buttercream was very light and airy, and had a wonderful flavor. It was a great accompaniment to the rich cake. I also liked the chocolate glaze, although i couldn’t really eat all of it. Maybe a tad bit of overkill? However, I am all about over indulgence. It’s easier not to eat a bite or two then it is to wish you had a little more and no more is to be found.
All in all it was a great recipe, and the results not only taste impressive, they look impressive. In this case, you really do eat with your eyes first – and I for one am glad I have the rest of this cake hanging out in my fridge for me to eye for a couple more days.
Bon Appétit!
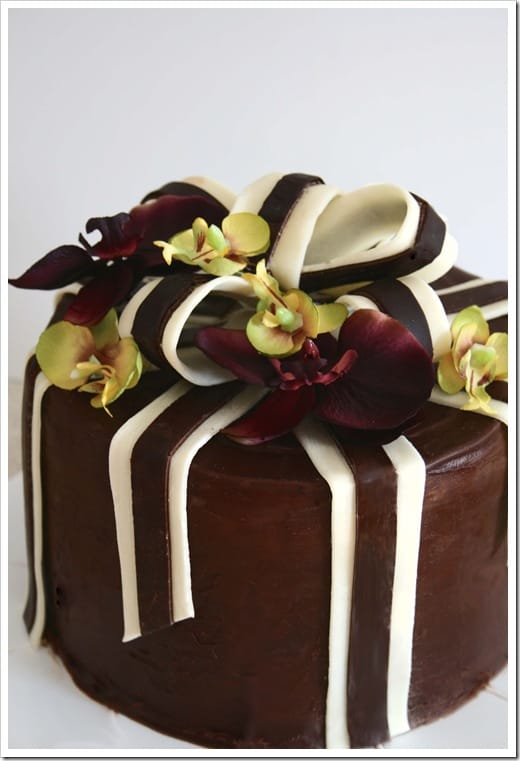
Spiced Chocolate Torte Wrapped in Chocolate Ribbons
12 to 14 servings
Recipe by Betty Rosbottom
Bon Appétit, December 2010 & December 1984
Ingredients
cake
- 1 1/2 cups (3 sticks) butter, room temperature
- 2 cups sugar
- 8 eggs, separated, room temperature
- 10 ounces bittersweet or semisweet chocolate (do not exceed 61% cacao), melted, lukewarm
- 1 1/2 cups finely chopped pecans
- 2 teaspoons vanilla
- 1 teaspoon ground cinnamon
- 1 teaspoon ground cloves
- 1 teaspoon freshly grated nutmeg
- 1 1/3 cups unbleached all purpose flour, sifted (measured, then sifted)
- Pinch of salt
- Pinch of cream of tartar
buttercream
- 3/4 cup sugar
- 1/2 cup light corn syrup
- 4 jumbo egg yolks
- 1 1/2 cups (3 sticks) butter, cut into small pieces, room temperature
- 6 ounces bittersweet or semisweet chocolate (do not exceed 61% cacao), melted and cooled (but still pourable)
- 1/4 cup dark rum
glaze
- 12 ounces bittersweet or semisweet chocolate (do not exceed 61% cacao), chopped
- 3/4 cup (1 1/2 sticks) unsalted butter, cut into 12 pieces
- 2 tablespoons honey
- 3/4 teaspoon instant espresso powder or instant coffee powder
chocolate ribbons
-
- 7 ounces high-quality white chocolate (such as Lindt or Perugina), chopped
- 1/2 cup light corn syrup, divided
- 7 ounces bittersweet or semisweet chocolate (do not exceed 61% cacao), broken into pieces
test-kitchen tips
- 1.Chill the buttercream for 30 minutes to firm it up before spreading it on the cake layers. This makes the spreading much easier and ensures that the buttercream will hold up when the cake layers are assembled.
- 2. Dusting the chocolate ribbon dough with powdered sugar before rolling it through the pasta machine helps to prevent it from sticking.
- 3. If the bittersweet chocolate strips don’t stick when you place them atop the white chocolate strips for the ribbon assembly, lightly brush one side of the bittersweet chocolate strips with light corn syrup, then place atop the white chocolate strips, syrup side down, and press lightly to adhere.
Preparation
cake
- Position rack in center of oven and preheat to 350°F. Butter and flour three 9-inch-diameter cake pans with 11/2-inch-high sides. Line bottom of each cake pan with waxed paper; butter and flour waxed paper.
- Using electric mixer, cream butter in large bowl. Gradually beat in sugar until smooth. Beat in egg yolks 1 at a time. Blend in melted chocolate. Slowly mix in pecans, vanilla, and spices. Gently fold in flour in 4 batches (batter will be very thick and dense).
- Using electric mixer fitted with clean dry beaters, beat egg whites with salt and cream of tartar in another large bowl until medium peaks form. Gently fold 1/4 of whites into batter to lighten, then fold in remaining whites. Divide batter among prepared pans, spreading evenly. Bake until toothpick inserted into center of cake comes out clean, 35 to 40 minutes. Run knife around sides of each cake. Let stand 10 minutes. Invert cakes onto racks. Cool to room temperature. DO AHEAD Cakes can be made up to 2 weeks ahead. Wrap tightly and freeze.
buttercream
- Stir sugar and corn syrup in heavy medium saucepan over medium heat until sugar dissolves. Increase heat and boil 1 minute. Meanwhile, using electric mixer, beat egg yolks in medium bowl until pale and thick. Gradually beat in hot sugar syrup; continue beating until mixture is completely cool, about 5 minutes. Beat in butter 1 piece at a time, incorporating each piece completely before adding next. Blend in melted chocolate, then rum. (If buttercream looks broken or curdled, place bowl with buttercream over medium heat on stove burner and whisk 5 to 10 seconds to warm mixture slightly, then remove from heat and beat mixture again on medium speed. Repeat warming and beating as many times as needed until buttercream is smooth.)
- Reserve 1/2 cup buttercream. Set 1 cake layer, flat side up, on rack; spread with half of remaining buttercream. Top with second cake layer; spread with remaining buttercream. Top with third cake layer; use reserved 1/2 cup buttercream to fill in seam where cake layers meet. Freeze cake until buttercream is firm, about 2 hours.
glaze
- Stir all ingredients in top of double boiler over gently simmering water until mixture is smooth. Remove from over water. Stir until glaze is thickened, about 5 minutes (do not allow glaze to set).
- Pour 3/4 of glaze over top of cake. Carefully and quickly tilt cake back and forth so glaze coats sides; smooth sides with spatula, adding some of remaining glaze where necessary. Chill cake until glaze is set.
chocolate ribbons
- Melt white chocolate in top of double boiler over gently simmering water; stir until smooth. Stir in 1/4 cup corn syrup. Pour onto baking sheet. Chill until firm, 30 to 40 minutes. Transfer white chocolate to work surface and knead several minutes. Shape white chocolate dough into ball. Wrap in plastic. Let white chocolate dough stand at room temperature 1 hour.
- Repeat with bittersweet chocolate and remaining 1/4 cup corn syrup.
- Cut white chocolate dough into 4 pieces. Flatten 1 piece into rectangle. Turn pasta machine to widest setting. Run chocolate through 3 times, folding into thirds before each run. Adjust machine to next narrower setting. Run chocolate through machine without folding. If chocolate is more than 1/16 inch thick, run through next narrower setting. Lay chocolate piece on rimless baking sheet. Repeat flattening, folding, and rolling with remaining chocolate pieces. Repeat process with bittersweet chocolate dough.
- Cut four 8×1-inch strips from rolled white chocolate dough and four 8×1/2-inch strips from rolled bittersweet chocolate dough. Center bittersweet chocolate strips atop white chocolate strips to form 4 ribbons. Run 1 ribbon from base of cake to center. Arrange remaining 3 chocolate ribbons equidistant from each other in same fashion so ribbons meet in center (Step 1).
- Cut ten 6 1/2×1-inch strips from rolled white chocolate dough and ten 61/2×1/2-inch strips from rolled bittersweet chocolate dough. Center bittersweet chocolate strips atop white chocolate strips to form 10 ribbons. Cut ends off 2 ribbons on diagonal. Starting at center, drape ribbons over top and sides of cake to form trailers. To form loops for bows, fold remaining 8 ribbons in half, layered side out. Cut ends into V shapes (Step 2). Arrange ribbon halves with V shapes at center of cake to form bow (Step 3).
- Cut one 3×1-inch strip of white chocolate and one 3×1/2-inch strip of bittersweet chocolate. Center bittersweet chocolate strip atop white chocolate strip. Fold in ends of chocolate strips and pinch to resemble knot; place in center of bow. Carefully transfer cake to serving platter or cake stand. DO AHEAD Cake can be prepared up to 1 day ahead. Cover and refrigerate. Bring cake to room temperature before serving.
By the way…today is National Bittersweet Chocolate Day, and I have a gorgeous round up of some incredible looking goodies on my new Official Food Holidays site – I hope you’ll check it out! Many of the links are from blogger buddies, and I know they would love to hear what you think of their creations!


