
World Peace Cookies
I’m participating in REAL® SEAL’s Virtual Cookie Swap Party. Each day, REAL® Seal will showcase a different yummy recipe on their Facebook page.
I wish I could say I invented these darling cookies, but alas, I did not.
Dorie Greenspan, the woman I truly credit with teaching me to bake, created these quite some time ago. When I first started blogging, I joined Tuesdays With Dorie, a group of bakers and wannabe bakers that joined together each week to bake out of Dorie’s cookbook. Before I joined, I knew nothing about baking. But that group was SO special. I made friends, and supporters, and gosh…I just loved it. I still cherish the friends I made in that group. And hey, I learned to bake. It happened.
But I digress.

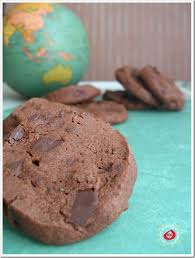
World Peace Cookies.
Originally called Korova Cookies, Dorie’s friend and neighbor found them so delicious that he felt a daily dose of them would bring about World Peace.
With everything going on in our world today, from the senseless deaths in Paris, to school bombings, to babies being buried alive, I am ready for anything that will bring all of us a little peace. I can hardly bear to scan the Facebook feeds, as there are so many heartbreaking stories. Have you noticed? Is it just me, or are things just not the idyllic way they were when we were growing up? Of course, I barely remember the Cold War, and anything pre-internet was rarely discussed. Not like today, where we all share, and overshare, and put our own spin on it. It’s a great social tool, but also…not. Maybe it would be better if we all just took a little step back, and made some cookies to share.
World Peace Cookies.
 No, they may not bring the world together, but they will be sweet, and shareable, and y’all, it’s the holidays, so lets just be happy, and spread the love.
World Peace Cookies
adapted from Baking: From My Home to Yours, Dorie Greenspan
Makes about 36 cookies
Ingredients
- 1 cup plus 3 tablespoons all-purpose flour
- 1/3 cup unsweetened cocoa powder
- 1/2 teaspoon baking soda
- 1 stick plus 3 tablespoons (11 tablespoons) unsalted butter, at room temperature
- 2/3 cup (packed) light brown sugar
- 1/4 cup sugar
- 1/2 teaspoon fleur de sel or 1/4 teaspoon fine sea salt
- 2 teaspoons vanilla extract
- 5 ounces semisweet chocolate, chopped into chips, or a generous 3/4 cup store-bought mini chocolate chips
Instructions
Sift the flour, cocoa and baking soda together.
Working with a stand mixer, preferably fitted with a paddle attachment, or with a hand mixer in a large bowl, beat the butter on medium speed until soft and creamy. Add both sugars, the salt and vanilla extract and beat for 2 minutes more.
Turn off the mixer. Pour in the flour, drape a kitchen towel over the stand mixer to protect yourself and your kitchen from flying flour and pulse the mixer at low speed about 5 times, a second or two each time. Take a peek — if there is still a lot of flour on the surface of the dough, pulse a couple of times more; if not, remove the towel. Continuing at low speed, mix for about 30 seconds more, just until the flour disappears into the dough — for the best texture, work the dough as little as possible once the flour is added, and don’t be concerned if the dough looks a little crumbly. Toss in the chocolate pieces and mix only to incorporate.
Turn the dough out onto a work surface, gather it together and divide it in half. Working with one half at a time, shape the dough into logs that are 1 1/2 inches in diameter. Wrap the logs in plastic wrap and refrigerate them for at least 3 hours. (The dough can be refrigerated for up to 3 days or frozen for up to 2 months. If you’ve frozen the dough, you needn’t defrost it before baking — just slice the logs into cookies and bake the cookies 1 minute longer.)
GETTING READY TO BAKE: Center a rack in the oven and preheat the oven to 325 degrees F. Line two baking sheets with parchment or silicone mats.
Working with a sharp thin knife, slice the logs into rounds that are 1/2 inch thick. (The rounds are likely to crack as you’re cutting them — don’t be concerned, just squeeze the bits back onto each cookie.) Arrange the rounds on the baking sheets, leaving about 1 inch between them.
 Bake the cookies one sheet at a time for 12 minutes — they won’t look done, nor will they be firm, but that’s just the way they should be. Transfer the baking sheet to a cooling rack and let the cookies rest until they are only just warm, at which point you can serve them or let them reach room temperature.
SERVING: The cookies can be eaten when they are warm or at room temperature — I prefer them at room temperature, when the textural difference between the crumbly cookie and the chocolate bits is greatest — and are best suited to cold milk or hot coffee.
STORING: Packed airtight, cookies will keep at room temperature for up to 3 days; they can be frozen for up to 2 months.
I created these cookies with Real® Seal (you recognize the logo, for sure!) in mind. The most delicious cookies start with the freshest and most delicious dairy products. Real Seal is the Real Deal. Look for it! (I used REAL Butter!)
 What does the Real Seal mean? Good question. The dairy industry four decades ago created the REAL® Seal. It’s an assurance that you are buying a genuine dairy product, made with milk from cows on U.S. dairy farms, and meeting strict manufacturing requirements. When you see the REAL® Seal on a dairy product or in a store or restaurant, you can trust it’s the real thing, and not an imitation.
To learn more about what the REAL® Seal means to consumers, what products carry the REAL® Seal, or what using the REAL® Seal can do for business, click on one of the links above. You can also visit the REAL® Seal Facebook page.
This December, REAL® Seal is celebrating the Holiday season by kicking off the REAL® Sweet Holiday Memories campaign. REAL® Seal is inviting everyone to have some seasonal fun with a Pin-To-Win Sweepstakes:
When? December 14st – December 18th
Why? Winner will receive a $100 Visa Gift Card!
So get involved!
Disclaimer: This post was sponsored by Real Seal. All thoughts and opinions are my own.


